One of my favorite things about the Chrome web browser is how extensible it is. It seems like there is a Chrome plugin for just about everything you could ever possibly want.
But, have you ever wanted to create your own Chrome extension? Have you ever wondered how difficult the process would be or what it would entail? Well, it turns out it is super easy—probably a lot easier than you ever imagined.
In this tutorial I am going to show you how to create a basic Chrome extension in about 5 minutes—no joke!
What we are going to build
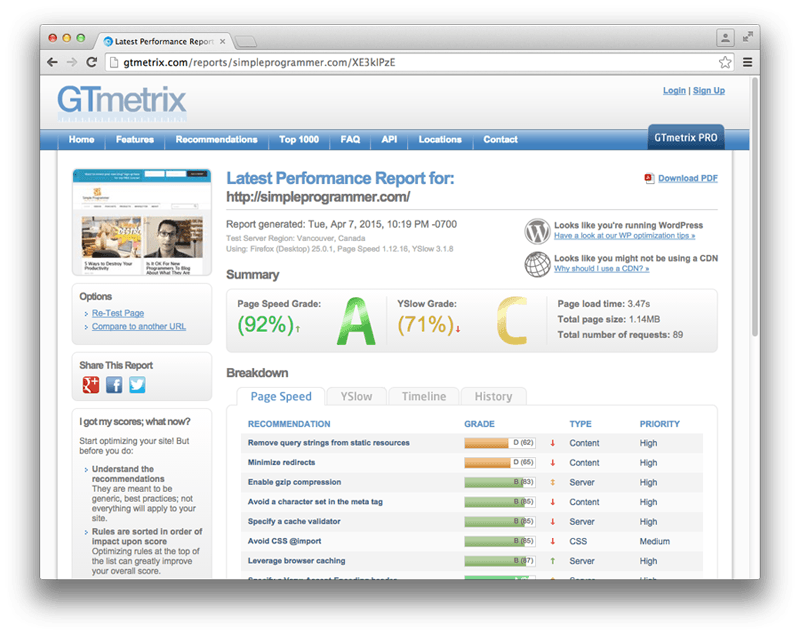
I’m pretty obsessed about the speed of my website, http://simpleprogrammer.com, so I often utilize sites like GTmetrix to check my site speed, just to make sure it isn’t slowing down.

I’ll often check other sites that I’m on as well, so I can see how they compare.
Well, wouldn’t it be nice if there was a Chrome extension that allowed you to use GTmetrix to check the site speed of whatever site you happened to be browsing, just by clicking a button?
I checked the Chrome Web Store and there wasn’t an extension that performed this action, so that’s exactly what we are going to build today.
What is a Chrome Extension?
Before we get started building our extension, it’s probably a good idea to have a basic understanding of what a Chrome extension is and how Chrome extensions work.
At a very basic level, a Chrome extension is just some HTML, CSS and JavaScript that allows you to add some functionality to Chrome through some of the JavaScript APIs Chrome exposes. An extension is basically just a web page that is hosted within Chrome and can access some additional APIs.
In this tutorial, I’m going to show you how to create a basic Chrome extension called a Browser Action extension. This kind of extension puts a button in the Chrome toolbar that will show an HTML page when clicked and optionally execute some JavaScript.
Chrome extensions can also be created to work only on certain pages through the use of Page Actions, they can run code in the background using Background Pages, and they can even modify an existing page loaded in the browser using Content Scripts. But for this tutorial we are going to keep things simple.
If you are interested in learning more about Chrome extensions in general, check out Chrome’s extensions documentation.
Step 1: Create the project
The first thing we need to do is create the project and all the files we need for our extension. Let’s start by creating a new directory that we’ll call “GTmetrix Extension.” We’ll put all the files we need for our extension in this new folder. Chrome allows us to load up a plugin by pointing it at a folder that contains the extension files.
All Chrome extensions require a manifest file. The Manifest file tells Chrome everything it needs to know to properly load up the extension in Chrome. So we’ll create a manifest.json file and put it into the folder we created. You can leave the manifest file blank for now.
Next we’ll need an icon for our extension. This just needs to be a 19x19px PNG file. You can get a sample icon from Google’s demo project that you can modify.
Next we’ll need an HTML page to show when a user clicks our Browser Action, so we’ll create apopup.html file and a popup.js file in our “GTmetrix Extension” directory.
Due to security constraints, we can’t put inline JavaScript into our HTML files inside of our Chrome extensions, so we have to create a separate file to hold any JavaScript code we need and we’ll reference it from the HTML file.
Step 2: Create the manifest file
Now that we have our basic project structure, we need to add the code to our manifest file to describe our plugin to Chrome.
Open up the manifest.json file and enter the following code:
Most of the fields in this JSON file are self-explanatory, so I won’t waste your time explaining everything, but take note of the browser_action section where we specify what the default icon is and what HTML page should be displayed when the Browser Action button is clicked.
You’ll also notice I’ve added a permissions section that specifies that we need to have permission to access the activeTab. This is required in order to enable us to get the URL of the current tab to pass on to GTmetrix.
Many of the APIs Chrome exposes for you to use with your extensions require you to specify any permissions you require.
Step 3: Create the UI
The next step is to create the user interface that our Browser Action will display when it is clicked.

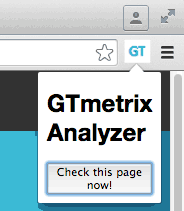
Our user interface is going to be very simple and consist of some text that says “GTmetrix Analyzer,” followed by a button that a user can click to perform the analysis on the current page.
Open up the popup.html page and add the following:
You’ll notice in this HTML I’ve included the popup.js script. This is where we’ll put the logic for our extension that will execute when the button with the checkPage id is clicked.
Step 4: Implement the logic
The last thing we need to do to create the plugin is to implement the logic that should execute when a user clicks the “Check this page now!” button inside of a tab.
We’ll want to add an event listener to listen for the click event on the checkPage button. When it is clicked, we’ll need to create a new form to submit to GTmetrix that contains the URL of the current page, submits it, and then displays the result.
Open up the popup.js file and add the following code:
I borrowed most of the code to create and submit the form from the bookmarklet provided on the GTmetrix website. I just modified the code to take in the URL from the currently active tab.
If you examine the code above, you’ll see that we are first registering a handler for the clickevent on the checkPage button. Then, when the button is clicked, we get the currently selected tab and execute some JavaScript to create a form with some hidden fields that is submitted to GTmetrix. We use the URL from the current tab to tell GTmetrix which page to execute the test for.
Testing it out
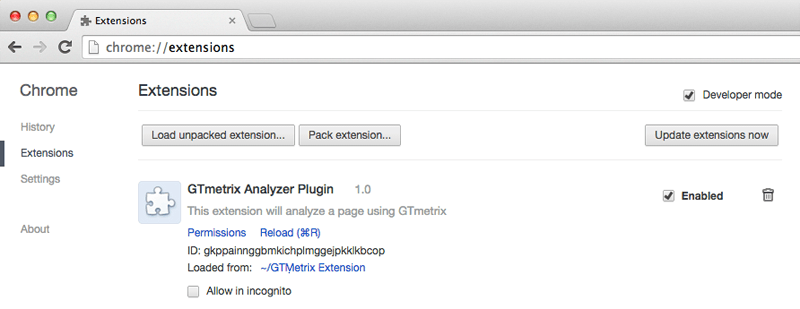
It’s really easy to test a new extension in Chrome. Type “chrome://extensions” in a tab to bring up the extensions page.

Once on this page, check “Developer mode” to enable loading unpacked extensions. This will allow you to load your extension from a folder. Finally, click “Load unpacked extension” or simply drag the “GTmetrix Extension” folder onto the page to load up the extension. You should immediately see the extension show up as a Browser Action with your icon in the toolbar window of the current tab.
To test out the extension, navigate to a page you want to test with GTmetrics. Then, go ahead and click the icon for our GTmetrix extension. When the HTML page comes up, click “Check this page now!” and you should immediately see the request and results from the current page being displayed.
And that’s it! If you have any problems or questions, feel free to add to the discussion below. I hope this introduction to creating Chrome extensions has been sufficient to get you started.
SitePoint.com
See more
https://developer.chrome.com/getstarted
http://lifehacker.com/5857721/how-to-build-a-chrome-extension
But, have you ever wanted to create your own Chrome extension? Have you ever wondered how difficult the process would be or what it would entail? Well, it turns out it is super easy—probably a lot easier than you ever imagined.
In this tutorial I am going to show you how to create a basic Chrome extension in about 5 minutes—no joke!
What we are going to build
I’m pretty obsessed about the speed of my website, http://simpleprogrammer.com, so I often utilize sites like GTmetrix to check my site speed, just to make sure it isn’t slowing down.

I’ll often check other sites that I’m on as well, so I can see how they compare.
Well, wouldn’t it be nice if there was a Chrome extension that allowed you to use GTmetrix to check the site speed of whatever site you happened to be browsing, just by clicking a button?
I checked the Chrome Web Store and there wasn’t an extension that performed this action, so that’s exactly what we are going to build today.
What is a Chrome Extension?
Before we get started building our extension, it’s probably a good idea to have a basic understanding of what a Chrome extension is and how Chrome extensions work.
At a very basic level, a Chrome extension is just some HTML, CSS and JavaScript that allows you to add some functionality to Chrome through some of the JavaScript APIs Chrome exposes. An extension is basically just a web page that is hosted within Chrome and can access some additional APIs.
In this tutorial, I’m going to show you how to create a basic Chrome extension called a Browser Action extension. This kind of extension puts a button in the Chrome toolbar that will show an HTML page when clicked and optionally execute some JavaScript.
Chrome extensions can also be created to work only on certain pages through the use of Page Actions, they can run code in the background using Background Pages, and they can even modify an existing page loaded in the browser using Content Scripts. But for this tutorial we are going to keep things simple.
If you are interested in learning more about Chrome extensions in general, check out Chrome’s extensions documentation.
Step 1: Create the project
The first thing we need to do is create the project and all the files we need for our extension. Let’s start by creating a new directory that we’ll call “GTmetrix Extension.” We’ll put all the files we need for our extension in this new folder. Chrome allows us to load up a plugin by pointing it at a folder that contains the extension files.
All Chrome extensions require a manifest file. The Manifest file tells Chrome everything it needs to know to properly load up the extension in Chrome. So we’ll create a manifest.json file and put it into the folder we created. You can leave the manifest file blank for now.
Next we’ll need an icon for our extension. This just needs to be a 19x19px PNG file. You can get a sample icon from Google’s demo project that you can modify.
Next we’ll need an HTML page to show when a user clicks our Browser Action, so we’ll create apopup.html file and a popup.js file in our “GTmetrix Extension” directory.
Due to security constraints, we can’t put inline JavaScript into our HTML files inside of our Chrome extensions, so we have to create a separate file to hold any JavaScript code we need and we’ll reference it from the HTML file.
Step 2: Create the manifest file
Now that we have our basic project structure, we need to add the code to our manifest file to describe our plugin to Chrome.
Open up the manifest.json file and enter the following code:
| { "manifest_version": 2, "name": "GTmetrix Analyzer Plugin", "description": "This extension will analyze a page using GTmetrix", "version": "1.0", "browser_action": { "default_icon": "icon.png", "default_popup": "popup.html" }, "permissions": [ "activeTab" ] } |
Most of the fields in this JSON file are self-explanatory, so I won’t waste your time explaining everything, but take note of the browser_action section where we specify what the default icon is and what HTML page should be displayed when the Browser Action button is clicked.
You’ll also notice I’ve added a permissions section that specifies that we need to have permission to access the activeTab. This is required in order to enable us to get the URL of the current tab to pass on to GTmetrix.
Many of the APIs Chrome exposes for you to use with your extensions require you to specify any permissions you require.
Step 3: Create the UI
The next step is to create the user interface that our Browser Action will display when it is clicked.

Our user interface is going to be very simple and consist of some text that says “GTmetrix Analyzer,” followed by a button that a user can click to perform the analysis on the current page.
Open up the popup.html page and add the following:
- Code:
<!doctype html>
<html>
  <head>
    <title>GTmetrix Analyzer</title>
    <script src="popup.js"></script>
  </head>
  <body>
    <h1>GTmetrix Analyzer</h1>
    <button id="checkPage">Check this page now!</button>
  </body>
</html>
You’ll notice in this HTML I’ve included the popup.js script. This is where we’ll put the logic for our extension that will execute when the button with the checkPage id is clicked.
Step 4: Implement the logic
The last thing we need to do to create the plugin is to implement the logic that should execute when a user clicks the “Check this page now!” button inside of a tab.
We’ll want to add an event listener to listen for the click event on the checkPage button. When it is clicked, we’ll need to create a new form to submit to GTmetrix that contains the URL of the current page, submits it, and then displays the result.
Open up the popup.js file and add the following code:
| document.addEventListener('DOMContentLoaded', function() { var checkPageButton = document.getElementById('checkPage'); checkPageButton.addEventListener('click', function() { chrome.tabs.getSelected(null, function(tab) { d = document; var f = d.createElement('form'); f.action = 'http://gtmetrix.com/analyze.html?bm'; f.method = 'post'; var i = d.createElement('input'); i.type = 'hidden'; i.name = 'url'; i.value = tab.url; f.appendChild(i); d.body.appendChild(f); f.submit(); }); }, false); }, false); |
I borrowed most of the code to create and submit the form from the bookmarklet provided on the GTmetrix website. I just modified the code to take in the URL from the currently active tab.
If you examine the code above, you’ll see that we are first registering a handler for the clickevent on the checkPage button. Then, when the button is clicked, we get the currently selected tab and execute some JavaScript to create a form with some hidden fields that is submitted to GTmetrix. We use the URL from the current tab to tell GTmetrix which page to execute the test for.
Testing it out
It’s really easy to test a new extension in Chrome. Type “chrome://extensions” in a tab to bring up the extensions page.

Once on this page, check “Developer mode” to enable loading unpacked extensions. This will allow you to load your extension from a folder. Finally, click “Load unpacked extension” or simply drag the “GTmetrix Extension” folder onto the page to load up the extension. You should immediately see the extension show up as a Browser Action with your icon in the toolbar window of the current tab.
To test out the extension, navigate to a page you want to test with GTmetrics. Then, go ahead and click the icon for our GTmetrix extension. When the HTML page comes up, click “Check this page now!” and you should immediately see the request and results from the current page being displayed.
And that’s it! If you have any problems or questions, feel free to add to the discussion below. I hope this introduction to creating Chrome extensions has been sufficient to get you started.
SitePoint.com
See more
https://developer.chrome.com/getstarted
http://lifehacker.com/5857721/how-to-build-a-chrome-extension


 Ngày khởi sự

