


 Ngày khởi sự
 Đến từ
 Côngviệc / Sởthix
Trong Proshow

Hướng dẫn chi tiết bằng hình ảnh:
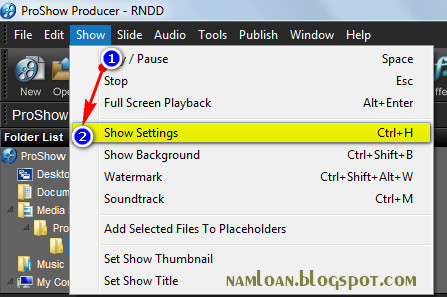
- Bước 1: Các bạn vào Show tiếp tục chọn Show Settings
Trong phần mềm Proshow produce có 2 chuẩn tỷ lệ màn hình là 16:9 và 4:3, mỗi tỷ lệ màn hình có một ưu điểm chung, Bài viết này namloan sẽ hướng dẫn các bạn cách thay đổi tỷ lệ khung hình trong phần mềm tạo video, clip Proshow Produce.
Sự khác nhau giữa 2 loại tỷ lệ khung hình 16:9 và 4:3
Chuẩn 4:3
4:3 (1.33:1) dùng cho truyền hình tiêu chuẩn từ khi phát minh máy quay phim và nhiều màn hình máy tính để có cùng tỉ lệ. 4:3 là tỉ lệ của phim 35 mm trong kỷ nguyên phim câm, tỷ lệ này hiện nay không phổ biến nữa, chỉ còn tồn tại trên các màn hình bóng hình rất dầy và nặng.
Chuẩn 16:9
16:9 (1.77:1) là chuẩn quốc tế của truyền hình độ nét cao, truyền hình không phải kỹ thuật số chất lượng cao (HD)và truyền hình màn ảnh rộng analog PALplus, điểm rất dễ nhân thấy ở loại màn hình sử dụng tỷ lệ 16:9 này là hình chữ nhật, đây cũng là chuẩn màn hình phổ biến và được sử dụng rộng rãi nhất hiện nay.
Cách chuyển đổi tỷ lệ khun hình 16:9 và 3:4 trong phần mềm Proshow Produce
Bạn có thể xem video hoặc hướng dẫn bên dưới dây:
Hướng dẫn chi tiết bằng hình ảnh:
- Bước 1: Các bạn vào Show tiếp tục chọn Show Settings
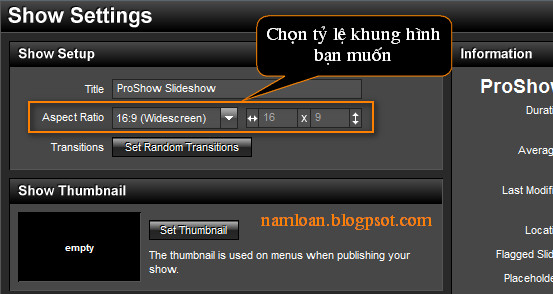
- Bước 2: Tại mục Aspect Ratio bạn chọn tỷ lệ khung hình mà bạn muốn và bấm Ok để lưu lại thiết lập của bạn.
Như vậy là bạn đã có thể thiết lập lại tỷ lệ khung hình mà bạn muốn, chúc bạn thành công.
Bởi namloan
_______________________________________
Với Corel
Chỉ chú ý thiết lập trong bước xuất ra hoặc khi nhập nguyên liệu

What you will learn:
• Adjusting project settings
• Gathering content for the slideshow
• Customizing transition effects
• Exporting the project as a DVD slideshow
Adjusting settings
Before starting the project, change a few default settings.
1. Click Settings menu > Preferences.
2. Click the Edit tab.
3. Set the Default photo/color duration control to 8. The default duration is 3 seconds, but for this tutorial, the duration of each image is 8 seconds.
4. Set the Default transition effect duration control to 2.
5. Check the Automatically add transition effect option box.
6. Click on OK to apply the changes.

Gathering content
Now, add the slideshow content.
1. Click the Show Library Panel Navigation button .
2. Click the Add a new folder button, and name the folder Slideshow.

3. Click the Import Media Files button.
The Browse media files dialog box appears.

4. Select images to include in the slideshow, and click OK. Thumbnails of the images appear in the Slideshow folder.
5. Position your cursor over a thumbnail, right-click, and choose Insert To Video Track.

6. On the Toolbar, click the Fit project in Timeline window button. Corel VideoStudio Pro X5 applies the set clip duration and randomized transition effects to the images.
7. Click the Video Track, press Ctrl key + A to select all the images.

8. Right-click any image in the Video Track, and choose Auto Pan & Zoom. Corel VideoStudio Pro X5 applies randomized pan and zoom effects to the images.

Customizing the applied effects
1. Right-click any image in the Video Track, and choose Open Options Panel.
2. In the Options panel, click Customize. The Pan & Zoom dialog box appears.
3. Adjust the starting and ending key frames to customize the Pan & Zoom effect.
4. Click OK.


Exporting the project as a DVD slideshow
1. Click the Share tab to open the Share step panel.
2. Click Create Video File, and choose DVD Slideshow (4:3) or DVD Slideshow (4:3).
3. In the Create Video File dialog box, name the slideshow, and click Save.

What you will learn:
• Adjusting project settings
• Gathering content for the slideshow
• Customizing transition effects
• Exporting the project as a DVD slideshow
Adjusting settings
Before starting the project, change a few default settings.
1. Click Settings menu > Preferences.
2. Click the Edit tab.
3. Set the Default photo/color duration control to 8. The default duration is 3 seconds, but for this tutorial, the duration of each image is 8 seconds.
4. Set the Default transition effect duration control to 2.
5. Check the Automatically add transition effect option box.
6. Click on OK to apply the changes.
Gathering content
Now, add the slideshow content.
1. Click the Show Library Panel Navigation button .
2. Click the Add a new folder button, and name the folder Slideshow.
3. Click the Import Media Files button.
The Browse media files dialog box appears.
4. Select images to include in the slideshow, and click OK. Thumbnails of the images appear in the Slideshow folder.
5. Position your cursor over a thumbnail, right-click, and choose Insert To Video Track.
6. On the Toolbar, click the Fit project in Timeline window button. Corel VideoStudio Pro X5 applies the set clip duration and randomized transition effects to the images.
7. Click the Video Track, press Ctrl key + A to select all the images.
8. Right-click any image in the Video Track, and choose Auto Pan & Zoom. Corel VideoStudio Pro X5 applies randomized pan and zoom effects to the images.
Customizing the applied effects
1. Right-click any image in the Video Track, and choose Open Options Panel.
2. In the Options panel, click Customize. The Pan & Zoom dialog box appears.
3. Adjust the starting and ending key frames to customize the Pan & Zoom effect.
4. Click OK.
Exporting the project as a DVD slideshow
1. Click the Share tab to open the Share step panel.
2. Click Create Video File, and choose DVD Slideshow (4:3) or DVD Slideshow (4:3).
3. In the Create Video File dialog box, name the slideshow, and click Save.
By corel.force.com
___________________________________________________________________
Chú ý: Khi xuất ra chọn định dạng AVI (DV) hoặc MPEG-2

